how to use the peyton hall telescope
Congratulations; you have been assigned the task of using Peyton Hall's
telescope!
First, a word about the telescope, since interested people sometimes ask.
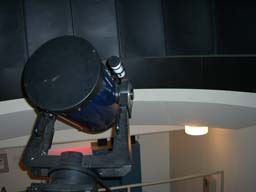
The telescope is a 12" Schmidt-Cassegrain reflector by Meade, which is a
high-end amateur telescope. You can buy similar telescopes for about
$5000, and they all come with electronic controllers such as this one these
days, which since they became possible just a decade or so ago have
revolutionized amateur astronomy. Our department also has a 4" Celestron
telescope that we can use on the roof, which cost about $400 and also comes
with its own electronic controller. Even though it has a smaller aperture,
you can see M31 easily through it from Princeton and you can probably see
many more objects from a dark site. If people are interested in taking up
amateur astronomy as a hobby, they should be aware that binoculars are
probably the way to go until they are serious, and then they could invest
in a small telescope like the Celestron. Other web pages describe a
recommended route to amateur astronomy in more detail.
You have been given a key to the room and a passcode to get in.
Upon entering the room, enter in the code followed by "1" to disarm the
alarm. It is helpful to have a computer with a web browser opened to the
peyton hall observing reference page.
|
Open the dome shutter with the crank.
|
|
|
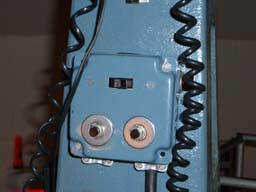
You'll be rotating the dome with the dome controls, two buttons which
rotate the dome in each of two possible directions. Beware, the switch
that turns on a mysterious red light doesn't actually have anything to do
with the dome controls.
|
|
|
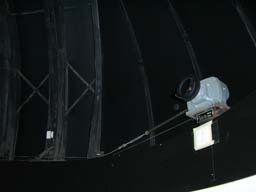
Turn on the telescope with the on/off switch located to the upper right in
the panel. This automatically turns on tracking as well as the computer
(hereafter controller) that we will be using to point at objects. Don't
touch the N/S switch: keep it on N, which indicates that we're in the
northern hemisphere.
|

|
|
You'll also want to take off the "lens" caps of the telescope and finder.
There should also be lens caps for the eyepiece ends, but sometimes they
get lost....
|
|
|
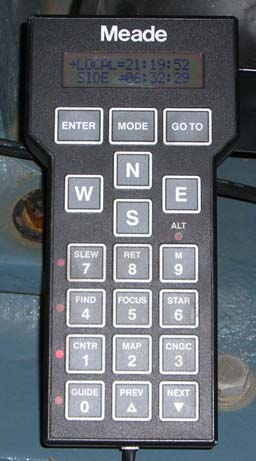
Now take a look at the controller. This is what you'll be using to point at
objects. In the following discussion note the difference between PRESSing a
button briefly and HOLDing it down for about a second - when you hold a
button usually it beeps to let you know you've held it successfully.
The telescope is on an
equitorial mount,
which means that the plate that it's mounted on has a normal vector
permanently pointed at the north pole. Thus, to track an object, the
telescope can rotate at the rate of one revolution per sidereal day in the
ra degree of freedom while keeping the dec degree of freedom fixed. That
means that in order to align the telescope (i.e. provide an absolute
reference point) you only need to tell it where one star is. Also,
the telescope needs to know what the sidereal time is, so let's start with
that.
When you turn the telescope on after having been off for a while the
controller seems to forget what time it is. It used to be able to
remember, but I think that a battery died somewhere; perhaps it would be
worth replacing this battery at some point. But you should at least check
to see if the local time (and date) is correct.
|
|
|
Feel free to press MODE repeatedly. You will cycle through about 4 or 5
modes, such as the following (one mode, not pictured, is a complete
shut-off of all light, so don't be fooled when you get to that mode).
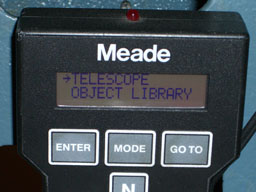
Telescope/Object library control various settings, such as the
location (i.e., Princeton's coordinates) - but these don't seem to be
forgotten with the dead battery as the time is. Consult the manual for more
info. |
|

This screen tells you the coordinates you're pointed at (not to be
trusted if you haven't aligned yet, of course). |
|
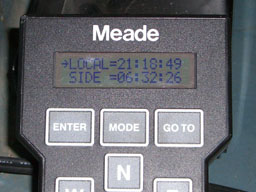
This screen tells you the local and sidereal time. |
|
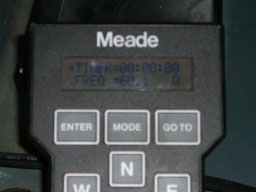
I don't know what this is all about. |
To set the time and date, press MODE until you see the local time, then
hold ENTER. Press numbers to set the time. W and E go forward and back if
you make a mistake. Press ENTER when done and enter hours from GMT
(remember, 5 in winter, 4 in summer); then press ENTER again. The local
time is set. Now press ENTER to get to the date display, and similarly
hold ENTER to set it. Once you've set the local time and date the sidereal
time should take care of itself and be correct; you can check it with a
sidereal time clock.
Setting the time is the hardest part. Now comes the fun part: finding a
bright star to align on. You need to find a bright star and know its name.
Use a star chart if you have to. (You can also align on the moon or planets
but I'll leave that as an exercise for the reader to figure out - it also
doesn't seem as reliable to me.)
Here is a helpful way
to memorize the 15 brightest stars. In the winter,
it's easy to locate Orion (which has Betelgeuse and Rigel); also note that
Castor and Pollux form a pair.
Slew the telescope to your star using the N, S, E, and W buttons. Make
sure the speed is set on SLEW (7). In order of decreasing speed, you can
also select FIND (4), CNTR (1), or GUIDE (0). Getting your star in the
field of view of the telescope (or even finder) may not be so easy at
first, but becomes easier with practice. Once your star is in the center
of the field, consult the
Meade starlist and find your star's
code. The following two pictures show how you might align on Sirius.
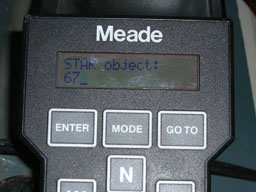
Press STAR (6) and then the code... |
|
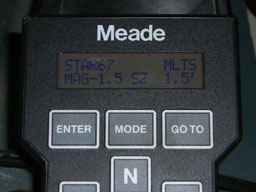
...then press ENTER. The display will tell you the object's magnitude
and size. |
So far we've just told the computer "tell me about Sirius." To
align the telescope on Sirius, hold ENTER until you hear a beep. The
telescope is now aligned and we can point at more interesting objects.
Now that you're on a star is a good time to make sure the focus is correct.
You can focus with the silver knob protruding from the backside of the
telescope. You can also focus by moving the eyepiece in and out, but since
it's complicated to describe to the public and has the potential of the
eyepiece falling out, keep that trick to yourself.
Use the observing list.
Objects are sorted by ra, which means all the
objects available for viewing at any one time are all in the same half of
the list. (To add items to the observing list, see my IDL routine
/u/esirko/WWW/public/sky/compile_obslist.pro.) To go to a Messier object,
press M (9) and then the Messier number. To go to an NGC object, press
CNGC (3) and then the NGC number. To go to a star, press STAR (6)
and then the star code. Planets are actually stars: press STAR (6) and
then 901 (Mercury), 902 (Venus), 903 (moon), 904 (Mars), etc. Once you
enter the code for the object you want to go to, press ENTER as before to
get its information; then press GOTO and the telescope will magically slew
to the right spot on the sky.
It is also possible to enter ra and dec coordinates directly, but I'll
leave that as an exercise for the reader. It usually won't be necessary.
cleaning up
Replace the "lens" caps. Park the telescope in home position to reduce
stresses on the mount. The two most important things to remember are:
1. TURN OFF THE TELESCOPE. Otherwise the telescope will continue to
rotate, once per day, and the cords will wind up and eventually rip. Or at
least the motor will compete with the cords. Someone loses.
2. CLOSE THE DOME. When you exit the room, enter your code followed by
"2." This code must be entered with the door closed. Then you have 30
seconds to exit. The alarm system's primary purpose is to ensure that the
dome is closed when you exit.
troubleshooting
The telescope complains that an object is below the horizon
when it is clearly above the horizon.... This is a symptom of the time
and date not being correct.
The telescope won't rotate in its full range of
motion.... This happened once when someone didn't know what they were
doing, apparently, and disengaged the dec locks on the telescope as a
substitute for pressing the N and S buttons.
policy
Public observing is held on the second Wednesday of every month,
rescheduled to the third Wednesday in the event of cloudy skies. We have
an admittedly complicated schedule, with public observing starting at 8:00
when daylight saving time is inactive (winter), and 9:00 when it is
(summer). This scheduling policy went into effect in 2005, because 8:00 is
too early for some months. Maybe it should change to become simpler in the
future. It is unclear what should be done if both Wednesdays are cloudy
- should you reschedule to the next Wednesday or cancel the month
completely? It is also unclear what happens during summer, but last
summer (2005) we took off the months of July and August. The academic year
lasts September through June, so public observing should be active during
those months.
Contact Charlotte in advance of observing, who will then contact the
appropriate authorities, which include 1. public safety unlocking and
locking the doors to Peyton hall, 2. authorization to use the roof, 3.
stadium lights being turned off, and 4. the construction light on Fine hall
being turned off. As a last resort, you may have to contact the person
responsible for the stadium lights directly; for their contact info, etc.,
see the file /u/esirko/notes/roof.txt.
Use as much information as you can in determining whether the weather will
be clear at public observing. The cleardarksky clock is a helpful
forecast; be familiar with their animated cloud map. But sometimes
additional information is helpful; I also try to look at accuweather.
Update the webpage by 3:00 on the day of scheduled public observing to
indicate whether that night's session is "ON" or "CANCELED." Remember to schedule the next session and
mark it as "SCHEDULED." The webpage is the file
/u/www/events/openhouse.html.
2006-2-7 Ed Sirko