For this activity you will need:
- A stick(a meter stick is best), protractor, safety pin and 2 coffee straws (preferably with red stripes on the sides) for every lab group.
- Masking tape
- 1 Additional Meter Stick
- Large Room with chalk board on at least 1 wall
- Some stiff clay
Directions for Teachers:
- Have the students construct an astrolabe out of 1 protractor, two straws, a safety pin, some modeling clay and a (meter) stick. This is done by gently pressing the point of the safety pin through each of the two straws very close to one end of each straw making sure the pin enters and exits through the red lines if your straws have them. The pin should act as a pivot for the two straws. Aligning the straws on the red lines assures that the straw is centered and will help with measuring the small angles later on. Now have the students place a small (1cm diameter) ball of clay onto the underneath side of the origin hole of the protractor. Now push the open safety pin through the hole of the protractor and clay fastening it on the "wrong" side of the protractor. The two straws should move freely one on top of the other. Now attach securely with masking tape the protractor to the middle of the (meter) stick. The (meter) stick should extend the baseline of the protractor. The (meter) stick will have to rest slightly to the curved side of the protractor since the safety pin will need to move slightly. The purpose of this attachment is so that the students can make sure their protractor aligns with their baseline for measurement.
- Place a meter stick vertically from the floor about 5-10 ft from the
chalk board so that the top is eye level. Taping it to a chair is an easy way to accomplish this. This is your "planet" and the chalkboard represents the background stars.
- Have the students spread out around the room and create different sized base lines by placing tape on the floor. The baselines should be as close to parallel as possible to the chalk board without detailed measurement. Have them range in size from about a foot to a few meters.
- Have the students record the relative positions and baseline sizes of
the groups around them. This will be useful to determine relative accuracies.
- Have the first partner stand in the middle of their taped baseline and have the second student record the length of the baseline and the distance between the first partner's eyes.
- Have the first student close his or her right eye and direct the
second student to mark a spot on the board where he or she sees the image
of the meter stick with his or her left eye.
- Now, have the student switch eyes so that the left eye is closed and
the right eye is open. Have the first student direct the second student
to make another mark on the board where he or she sees the image of the
meter stick with the right eye.
- Without moving, the first student should then measure the angle between the two marks on the board using the astrolabe. It is very important that the protractor is parallel to the board. For this reason, have the second partner make sure that the stick which extends the protractor is directly over the baseline as the first student makes their measurement.
- Have the first student line up one mark in each of the pivoting straws with the right eye while making sure the protractor is parallel to the board. Once the straws are lined up hold the straws in place and turn the protractor over to read the position of each straw. If you have straws with red lines, read the position of each red line (this is the center of each straw.)
- This first measurement is very difficult to make accurately, however, the measurement greatly improves once the baseline size is increased.
- Repeat steps 5-9, Only this time increase the size of baseline from the distance between the eyes to the entire taped baseline. Partner roles may be switched at this time.
- Have students calculate their distances from the meter stick using
trigonometry.
Student& data should be recorded and presented in group
format for two reasons; so that error analysis can be discussed and so
that students notice that measurements can be made from any location.
Students should also note that the further the observer from the meter
stick the smaller the measured angle. In fact, some students may not
notice any change in angle at all. This fact is also important as it
shows the limits to parallax measurement. These students should be
encouraged to find a way to measure the meter stick's parallax at
that distance, i.e. allow the observer to make left and right eye
observations
a few feet right and left of their baseline. Students should not be
allowed to directly measure the distance between their point of
observation and the meter stick, since this is not possible for
astronomers measuring the distance to stars. Instead, students should be
encouraged to reason out the accuracy of their results, perhaps by
comparing their results to those of students who observed farther away
from and closer to the meter stick and making sure the results are
consistent.
One might wonder why parallax measurement is useful since it is certainly easier to measure the distance to the meter stick directly than with parallax. Unfortunately, since the nearest star is 4.3 light-years away, astronomers cannot actually measure the distance to the star in the same way we can measure small distances and for this reason parallax becomes useful.
Parallax can be used to measure the distance to nearby stars since they can be measured against background stars, which do not appear to move as far, or in fact at all, due to parallax since they are so far away. This is because, as the students will have discovered during the activity, the farther from the "star" they are, the smaller the measured angle is on the background. After a star is far enough away, the angle is so small that even if telescopes were on opposite sides of the Earth they would not be able to measure the angle. In this case, the astronomers use the orbit of the Earth to increase the distance between right and left measurements. This is illustrated in the following diagram:
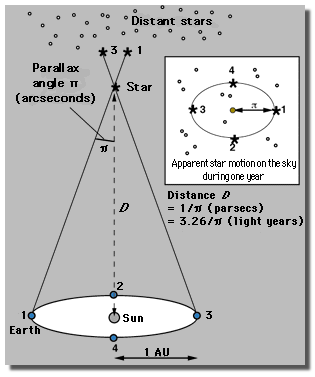
Parallax Diagram  11
11
This diagram shows three observations that are taken at three
different times during Earth's orbit to measure the parallax of a
nearby
star against three background objects: a spiral galaxy 12, an elliptical galaxy 13 and a barred spiral galaxy 14.